Peach tree
Accounting

Project
Submitted to:
Prof.Bilal Sarwar
Submitted by:
Samar
Khalid
L3f09bcom2567

University of central Punjab
Table of contents
Chapter no#01
Set up of a company
Chapter no#02
How to maintian an existing company
Chapter no#03
How to maintain a chart of account
Chapter no#04
· Maintain customer/ prospects
· Customer default
· Purchase order
· Payments
· Credit memo
Chapter no #05
· Vendor maintain
· Vendor default
· Sales order
· Receipts
Chapter no #06
Inventory
Chapter no#07
Maintain global
Chapter no #01
“SET UP OF A COMPANY”
Set
up of a company:
After the start of the
program the following screen will appear. To establish a new company click
“Setup a new company”
option and follow the next instructions.

From the screen click
on “set up a new company” a wizard will start from the introductory window

Company’s
name and address:
Now by clicking next
you have type the company information such as name, address, telephone no.
business type etc

Select
the following setup option:
Chart
of account:
Again by clicking next
you can chose among several methods to setup the charts of accounts. Here you
can chose charts of accounts already developed by the software of many sample
companies, or you can copy charts of accounts from existing Peachtree Company
or accounting software compatible with Peachtree or you can build your own
charts of accounts.
1: If you chose the
first option “Set up a new Retail, Service, Construction, Manufacturing, or
Distribution company, using a simplified charts of accounts” and then click
next button you will have the following window

1:1Now
select the charts of accounts that match your industry type from the list. If
you want to display the charts of accounts you selected, select the View Charts
of Accounts button.

2: Second
option is “Set up a new company using extensive charts of accounts from one of
many sample companies” Select the charts of accounts the matches your Business
type from the list. There are many options available.

2:1Now
select the charts of accounts that match your industry type from the list. If
you want to display the charts of accounts you selected, select the View Charts
of Accounts button.

3: Third option is
“Copy setting from an existing Peachtree company” Select this option if you
want to copy charts of accounts from another Peachtree company that is store in
your computer. Before selecting you may also check the established charts of
accounts by clicking the “View Charts of Accounts” button.

3:1Before
selecting you may also check the established charts of accounts by clicking the
“View Charts of Accounts” button.

4: Forth option is
“Convert a company from another accounting program” you may select this option
if you want to import company data from Peachtree Complete Accounting for DOS
or Peachtree Classic(PCA),Quicken, or some other program

5: The last option
is Charts of Accounts “Build your own company” one may select this option if
you want to create a company from scratch. This option is only recommended for
experienced user who is comfortable setting up accounting information.

Accounting
Method:
The next step will be to chose “Accounting Method”
There are two accounting method Cash and accrual .Accrual method is usually
followed, where we accrue expense and income weather paid or received or not.

First
we select accrual and click next button

Posting
Method:
Next phase will be to close the “Posting Method” By
selecting the Real Time posting method the transaction are posted to the
General Ledger as they are enter and saved. While in Batch, transactions are
saved by the program and then posted
in a group. This allow you to print and reconcile the transaction and then to
save

We
click on real time and click on next button

On next window we see accounting periods whish again
shows two options 12month accounting period and other one is accounting period
that do not match the calendar month then click on next button and move forward

First we click on 12 month accounting period click
on next button and move further

We see monthly accounting period which shows three
options which we have to fulfill on by one according to our company
1: when do you want your first fiscal year start?
First we select month and then year
2: what is the first month you will be entering
data? First enter month and then year
3: what is the first year you will be entering
payroll? Then only select only year
And click on next button

On next window we see a default here we click simply
next button and move further

We see on next window finish button is written we
click on it and close the Peachtree setup

Then we go back to see all options like cash base
and batch etc
Chapter no #02
How to open an existing company
Open
an existing company:
We select the option no. one “open an existing
company” when we select this option we automatically move on next window.

From this screen you will click on “Browse”.
When you will browse you will move on next screen.


From this screen you will see on left hand side
different options under heading Drives: you have to select drive in which your
company is available weather in c drive, z drive or in e drive. When you will
select a drive you will move on next screen.

From this screen you will see on left hand side
under heading Direction your selected drive your company name which were
already save in your selected drive if your company directed available in your
drive it will show on right hand side and if available in a specific folder you
have to select that folder.

From this screen you will see on right hand side
your company name you have to select this option and then click on “OK”
Chapter no#03
How to make a chart of accounts
General
ledger:
Now you have setup your company in Peachtree, it is
recommended to establish Chart of accounts, General Ledger Defaults and Beginning
Balance if any.
To establish the charts of accounts click the
maintains menu and select “Charts of Accounts….”

The
following window will displayed

Here you have to type Account ID and description and
the most Important Account Type.
Enter an account ID and description for the account.
The account ID determine how the account is identified and sorted in the charts
of accounts list and General Ledger account is displayed as typed in
description. Most charts of accounts are set up with specific accounts types
grouped together.
Account Types
Account types define how the account will be grouped
in reports and financial statements. They also control what happens during
fiscal year-end
General Ledger accounts are assigned types on the
General tab of maintains Charts of account window. Select an account type from
the drop-down list and select Save to save the account. The account type should
be selected carefully. If you are entering a Revenue account then its type will
be Income so on. A simplified charts of account with Account ID, Descriptions
and Account Type is given at the end of chapter
You can enter the Beginning Balance on the General
tab. Select the Beginning Balances button. Peachtree displays the select period
window.
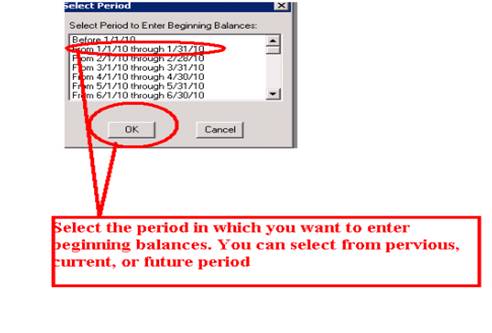
Select the period in which you want to enter
beginning balances. You can select from pervious, current, or future period

Click or tab to any of the white cells in the grid
to add an amount. (The grey cells are for viewing purpose only.)
Enter all the beginning balances for the accounts.
Scroll the list box to make sure the account amounts are correct.
If you are out of balances in the Beginning Balances
for General Ledger Accounts window, Peachtree displays a warning message
indicating that an equity account will be created (or updated)to contain the
difference or out-of –balance amount.
This account will be named Beginning Balance Equity,
and its type’s equity-Doesn’t close. This account does not appear in the
beginning balance window, but it will appear in the list of account and on
financial statements and general ledger reports.
Chapter no#04
Maintain customer/prospects
Maintain customer/prospects

·
Name and address information, including
separate billing and shipping information, e-mail address, and web site
address.
·
The date of the last invoice, statement
and payment received
·
Sale history, including year to date and
period to date sale and monthly totals
·
The usual sales account used for this customers
·
The preferred method of payment for this
customer
·
Terms of payment and sales tax code
·
The customers beginning balance

·
From maintain menu select
customers/prospects
·
Peachtree display the maintain
customer/prospective window
·
Enter a new customer ID, and complete
the necessary customer information
·
When you are finished filling in the window,
select the save button.
Tabs
names:
·
Customer/prospective
·
General
tab
·
Sales
defaults tab
·
Payment
defaults tab
·
Custom
field tab
·
History
tab

Customer
/prospect header field:
Customer header field are located above the folder
tabs of the maintain
Customer/prospects window. This is where you enter
lookup information about the customer such as the customer ID, name, and
status.
General
(maintain customer/prospects)
To enter basic information about the customer such
as information ,address, phone and fax numbers ,sales tax code ,and beginning
balances, select the general tab in the
maintain customer /prospects window

Enter
customer beginning balance
You save a customer; you can enter beginning balance
for the customer. When you are entering your customer beginning balance, do not
enter an invoice that you have already entered in the sales/invoicing window,
or the amount in the customer ledger

Sales
defaults (maintain customers/sales Reps):
To set up unique sales transaction defaults for each
customer record, select the sales default tab in the maintain
customer/prospectus window. You can change this information at the transaction
level, if necessary.
· Sales Rep: you
can enter the sales representatitve that has contact with the customer. The
sales representative must have already been entered in the maintain employee/
sales reps window
·
G
/L Sales account: Enter a general ledger account for the
default sales account for this customer. This normally an income account. When
selling inventory items, Peachtree overrides this account with the genersl
ledger default accounts set up in the maintain inventory items.
· In
this tab various options are available which is which according to the
requirements
· Open P.O#
· Ship via
· Resale#
· Pricing level

Payment
defaults (maintain customer/prospects)
To set up customized receipt settingd for each
customer record, select the payment defaults tab in the mainatin customer/proepects
window. You can change this information at the transaction level,if necessary.
· Card holder Name
· Address
· Crdit card number
· Expiration date
· Receipt settings

To enter custom field information for the selected
customer record, select the Customer fields tab in the maintain customer /
prospects window.
Custom field names are set up in customer dedaults.
1:
second contact
2:
refrance
3:
mailing list?
4:
multiples sites?
5:

History
field (maintain customer/prospects)
To display the selected customers current history,
selected the history tab in the mainatin customer prospects window. When
enetring a new customer you can enter information on this tab: once you can
svae the customer record this tab is for display purpose only
· Customer since
· Last invoice Date
· Last Invoice Amt
· Last Payment Date
· Last payment Amt
· Last Statement Date

Default information
Customer
Customer
Defaults
Peachtree lets you set
up default information for customer .Use this feature like tempalte or model
upon which to build all your customer records. You enetr the most common
information. Then, when you set up new customers and enter transaction, the
default information is automatically included. In most cases you won, t have to
enter anything .A name and address is all that’s required: then you are ready
to invoice
To
set up or review customer defaults
From the maintain menu select default information
and choose customer

Tabs
in customer default window
·
Payment terms
·
Account aging
·
Custom fields
·
Finance charges
·
Pay methods
1:
Payment Terms (Customer Defaults)
Standard
Terms
·
C.O.D
·
Net Due in
·
Discount
·
Discount
·
Credit Limit
G
/L Accounts
·
G /L Sles Account
·
Discount G/L Account


2:
Account Aging (Customer Defaults)
·
Age Invoice By
·
Aging Categories


3:
Custom Fields (Customer Defaults)
Custom fields let you use your imagination. What do
I really need to know about my customers? Select the Enabled check box to enter
or change the field label. If you decide not to use a field, clear the Enabled
check box.


4:
Finance Charge (Customer Defaults)
·
Charge Fianace Charge
In order to apply the finance charges, you have to
check the check the box or you can set according to your own choice by applying
it on the invoice according to your defined criteria.


5:
Pay Method (Customer Defaults)
This field header is used to set up payment methods
for thecustomers; you can set up to 10 payment methods to facilitate the
customer.

Sale order
Sales orders let you enter items for a customer,
then invoice and ship the itms as they become avaiblee in your inventory,
tracking the backorders in the system. You can veiw inventory reports that show
the number of items backorder for your customers to help you plan ypur
purchases
· To
open Peachtree’s Sales Order window, select Quotes/ Sales Order from the Task
menu. Then choose Sales Orders.
Enter
a Sales Order
Sales order let you enter items for a customer.
Later you can invoice and ship the items as they becom avaible in your
inventory, tracking the backorders in the system
1:
From the Task mene select Quotes/Sales Orders: then select Sales
Oreder from the sub mene
2: Enter or select the customer ID
3: Enter a sales order number if you want to chage
the one peachtree automatically terms and sales tax code
4: Enter the date of the sales order if it different
from the dispalyed date
5: Enter the date by which the oreder should be
shipped.
6: Enter the
customer’s purchase order number now or cahnge the default to anyother piece of
information that will identify this sales order to the customer
7: if you entered a default sales representative in
the customer record it will appear otherwisw selected the code of the sales
representative if applicable
8: enter the information for each itm includede on
the sales order on a seprate line, including the item’s quantity, item id ,
description , unit price
Note:
When you enter a quantity for a sales order, Peachtree checks available
inventory to fill the sales order. If quantity on sales order exceeds the
quantity on hand, a warning is issued (only if the warn if inventory item is
out of stock box on miantain
globle options
window is checked). This does nit prevent you from selling the item; it just
warns you that there is not enough of the item to complete the sales order.
9: the default G/L
sales account that appears for each line item is based on the customer sales
account default or the item id selected. To cahnge the account id type in this
field or selected the lookup button. To add a new account type or double click
the field which displays the mainatain charts of account window
10: select the print
button if you want to print and save the order.Otherwise click the save button

Credit Memos (Sales Returns)
Credit
Memo is used to record the returns from the customers whether on the direct sales
or on the existing invoices whose payments are not received.
- Let
see how to record “Returns from
Customers” in Peachtree Accounting Software:
- Go
to task menu bar and click on Credit
Memo, credit memo window will open.
- Enter
the Customer ID in the “Customer ID”
field who have Returned goods.
- Enter
the date of returning goods in the “Date”
field.
- Enter
the Reference no. for the transaction in the “Credit no.” field; it must be a distinct number to avoid any
errors.
- The
“Terms” field will be
automatically filled with the payment terms of the Customer whose ID is
enter, these are the terms that were selected when the Customer was
created.
- Enter
the Customer Purchase Order No. in the “Customer PO.” field against which the sales was made.
Now,
if there are any invoices pending on that Customer then “Apply to Invoice No.” tab will be activated, otherwise user can
only enter returns in the “Apply to Sales”
tab.
·
Select the “Invoice no” from the drop down list on the Apply to Invoices tab to
whom you want to charge the returns.
·
The Item
field, Quantity field, Unit Price field and Description field will be automatically
filled with the details of Invoice no. selected.
·
Enter the no. of items that are returned
in the “Returned” field.
·
The “Amount” field will be calculated by multiplying Returned field with
the Unit Price field.
·
Click on “Save” button to save the transaction.

Receipts
This allow you to enter
all checks, cah, and credit card slips you receive and deposit them in your
checking account
There are two ways you
can account for receipts in Peachtree
·
If you sent an invoice to a customer you
apply the recepit to the invoice. Invoices entered in the sales/ invoicing
windoe appears as distribution lines when you enter the customer id. You can
check the pay column beside each invoice being paid in full by this receipt. To
do select receipts from task menu
·
If you made a direct sale that didn’t
reqire an in voice you use receipts and enter it on the apply to revenue tab.
This requires you to speciify a chec number and sales account.
You can enter as many
as 500 lines per receipts. If you set up the distribution list box dor two
lines in the globle options menu description of the items job and account
appear in the second line
Maintain Inventory
Before you are able to
record transactions relating to inventory, you first need to set up your
inventory items in Peachtree. This topic shows you how to add an inventory item
into Peachtree, and how to modify or delete an item of inventory should the
need arise.
Creating an item inside
Peachtree is a very simple process:

This displays the
Maintain Inventory Items window where you can enter the details of the
inventory item into Peachtree. The following screenshot show step-by-step
instructions on how to enter an inventory item into the Maintain Inventory
Items window in Peachtree.
Description: Enter a
short description of the item of inventory.
Item
Class:
Select the class of the item from the
drop down list provided. For items of inventory to be resold you should select
'Stock item.
General
Tab:
Enter the relevant information about
that item. Note that for stock items you do not need to enter information into
the Last Unit Cost field. Peachtree will automatically update this field when
you enter the beginning balances of inventory items into Peachtree. Notice that
there are three general ledger account fields on the MAINTAIN INVENTORY ITEMS
window: GL SALES ACCT,
GL INVENTORY ACCT, and GL COST OF SALES ACCT. For a STOCK ITEM,
none of these fields can be left blank.
Other
tabs:
Enter the required information in the
other tabs. Note that if the Item Class selected is Stock item, you are unable
to enter any information into the Bill of Materials tab or the Item Attributes
tab. This is because the Bill of Materials tab is used only if the Item Class
selected is Assembly, while the Item Attributes tab is only used if the Item
Class selected is Master Stock item.
Once you have entered
the information in the Maintain Inventory Items window, remember to review your
entries and save the item of inventory by clicking the Save icon.
Enter
the beginning balances of inventory items
After adding the
inventory item into Peachtree you will also need to enter the beginning balance
of each item of inventory. You can either enter the beginning balance of each
item as you create the item using the Maintain Inventory Items window. However,
if you are creating several items of inventory at once, you can enter the
beginning balances of these items altogether at the same time.
To enter the beginning
balance of each inventory item, click the Beginning Balances arrow down the
bottom right hand corner of the Maintain Inventory Items window.


This will open the
Inventory Beginning Balances window. The following screenshot and description
show step-by-step instructions on how to enter the beginning balance of an
inventory item into the Inventory Beginning Balances window in Peachtree.


List of Inventory
Items: Select the item of inventory from the list by clicking on it.
Item ID and
Description: Note that the Item ID and the description of the item selected
appear at the top of this screen, Confirm that you have selected the correct
item.
Quantity: Enter the
number of units of that inventory item on hand in the Quantity field.
Unit Cost: Enter the
purchase price (unit cost) of one unit of that item of inventory.
Total Cost: Notice that
Peachtree automatically calculates the total cost of that many items of that
type of inventory.
Once you have entered
the information in the Inventory Beginning Balances window, remember to review
your entries and click the OK icon to save the information and update the
inventory totals.
Setting
Up an Assembly Item
An assembly is made up
of other items in your inventory; so when you build an assembly item, you can
only build as many as you have components.
There are two steps to
creating an assembly item:
1) Define the items
(components) the assembly contains.
2) Build the assembly.
Additionally, you can purchase prebuilt "assemblies."
From the Maintain menu,
select Inventory Items. Peachtree displays the Maintain Inventory Items window.
Enter the ID of the assembly, and select Assembly as the item class. An ID can
be created from the Description you enter.
After you finish
filling out the window, select the Bill of Materials tab. Select item IDs for
existing stock items or assemblies only, and enter the quantity. Press ENTER.
Do this for each item that makes up the assembly. When you're finished entering
the assembly item, select the Save button.
When you are finished
entering inventory items, select the Close button.
Next step is to enter
the beginning of the stock items that make the assembly item. Select the
Assembly item on the Maintain Inventory Items window; click the Beginning
Balances arrow down the bottom right hand corner of the Maintain Inventory
Items window.
In this way the process
of making assembly is finished, now you can check it by going Tasks Menu and
select the Assemblies.
Once you click on it, a
window Build/Inbuilt Assemblies will be open.
In this window, you
have to give Assembly item id and the quantity to build, if you do not have the
sufficient stock to build the required assemblies, a warning message will be
appear that the assemblies cannot be made due to the insufficient stock.
Maintain Vendors
Following are the steps
to create a Vendor:
1- First
of all go to the Maintain Menu and select the Vendors, you will get window of
Maintain Vendor.


2- There
are two fields: Header and Tab field.
3- In
the Header field type the Vendor id and the name of the Vendor.
4- In
the General tab, enter the general information about the vendor such as contact
information, address, telephone and website etc.
5- In
the Purchase Defaults tab, most important is to select the GL Purchase Acct. to
which the purchases will be charged, selection of shipping and delivery method.
6- In
the Custom Field tab, you can enter the additional information of the vendor.
7- In
the History tab, you can review the past transactions with the vendor.


Vendors Default Info.
1-
Go to Maintain Menu and click the
Default Information then select Vendors option, you will get following screen
to enter the Vendors default information.
2-
There are four tabs such as Payment
terms, Account Aging, Custom Fields and 1099 settings.
3-
In the payment terms, first you select
the standard payment terms and provide the id information for the GL Purchase
Acct and Discount GL Acct. in the GL Link Accounts.
4-
In the Account Aging tab, you can either
use invoice date or due date method to age the Account Payables or you can use
aging categories to filter the payables by setting your own range.
5-
In the Custom Fields, you can provide
additional information of the vendor.
Purchase
order
Enter
a purchase order
1:
From the tasks menu, select purchase order .Peachtree displays the purchase
order window.
2:
Enter or select the vendor id
3:
If you will be printing the purchase order and want Peachtree to automatically
assign this purchase order a number leave the PO# field blank. Other wise enter the purchase order number in this
field.
4:
If the purchase order date is not today date enter the date in the date field.
5:
Enter the date this purchase order is good
through in the Good Through
field.
6:
Change the discount amount as per requirement.
7:
Enter the information for each item on a separate line, including item’s number
quality item ID description unit price
8:
If your is an accural based company you can select the accounts payable G/L
account for this purpose .On financial statements this will be your account
payable libility account. If yours is a cash basis company this field will
display cash basis.
Note: If you have the hide general
ledger accounts globle option activated peachtree will not display the account
payable account field in this window. To modify the account payable used for
this purpose for this transaction you must select the jouranal button.
9:
Enter the information for each item on separate line, including the items
quantity item ID description, unit price
10:
Continue entering line items until you have to completed the purcjase order
11:
Select the print button if you want to print and save the order. Otherwise,
click the SAVE button.
Receive inventory on a purchase
order enter purchase in voice
After
you have entered a purchase order for your vendor, the next step is to receive
the inventory for that purchase as it arrives. Peachtree allows you to receive
a diifferent quantity for an item then you originally ordered. That is, you can
receive less than or more than the originally ordered quantity.
1:
From the Tasks menu, select Purchase/Receive Inventory. Peachtree display
the Purchase/Receive Inventory widow.
2:
Enter or select the vendor ID. To display a list of existing vendor, type in
this field or selelct the Lookup button.
Note: If you have open purchase
order with this vendor, the Apply to purchase order # tab disply in font
3:
E nter the vendors invoice number in the invoice field. This is required field.
Note: If you have received
inventory from a vendor by enetring a purcahse using “waiting on bill” option,
peachtree will warn you when select this vendor so you don’t enetr the invoice
for this vendor’s order twicw by mistake.
4:
Enter the date of the transation if it is different from the displayed date.
5: Change the
discount amount if nescessary, as well as the dislayed terms.
6: From
the drop-down list on the Apply to
Purchase Order # tab, select the
purcahse order number that you wayn to receive inventory against .Peachtree
displays the items on the order in the line –item list.
7: In
the Received field, enter the
quantity of an items received.
Payments
1:Pay
vendors
There
are two basic methods of paying vendors:
1:1
Apply vendor invoices: pay previously entered invoices in
the purchase window.
1:
2Apply to expenses (cash purchase): pay a vendor without
using a vendor invoice.
See
enter a cash purchase for fother
information.
2: To apply a payment to vendor
invoices
2:1From
the Task menu select Payments.
2:2 Enter
or select the vendor ID that you want to pay.
2:3 Enter
or select the cash account from which you will be writing the check
2:4
On the Apply to invoice tab select
the pay check box next each the invoices that you want to apply.
2:4:1
if you want to pay invoices in full place the cursor in the Amount column for the invoices and
select the Pay check box. Peachtree
will fill in the Amount Paid field.
2:4:2
if you want pay partial amounts on the invoice enter the amount. Peachtree will
automatically swlect the Pay check
box.
Note: If you over pay the amount a
credit is made to the vendor’d ledger: for underpayments, the payment amount is
applied to the invoice balance. You will need a referance number in order to
post or save the record.
3: Enter a payment to a vendor not
on file
4: Enter a manual check
5: Enetr a cash purchase and print
check
6: Print check for invoices
6:1:
To print an individual check for an invoice
6:2:
To print a check for more than one invoice
6:3:
To print check in abatch for vendor
7: Void Disbursment Check
7:1:
To void check from the task menu
7:2:
To void check from the payment window
8: When you void check

Vendor Credit Memos (Purchases Returns)
Vendors
Credit Memo is used to record the returns to the Vendors whether on the direct
purchases or on the existing invoices which have not been paid.
- Let
see how to record “Returns to
Vendors” in Peachtree Accounting Software:
- Go
to task menu bar and click on Vendor credit memo, vendor credit memo
window will open.
- Enter
the vendor ID in the “Vendor ID”
field to whom these Returns are made.
- Enter
the date of returning goods in the “Date”
field.
- Enter
the Reference no. for the transaction in the “Credit no.” field; it must be a distinct number to avoid any
errors.
- The
“Terms” field will be
automatically filled with the payment terms of the vendor whose ID is
enter, these are the terms that were selected when the vendor was created.
- Enter
the Account Payable account number in the “A/P Account” field to which this transaction will be charged.
- Now,
if there are any invoices pending on that vendor then “Apply to Invoice No.” tab will be
activated, otherwise user can only enter returns in the “Apply to Purchases” tab.

- Select
the “Invoice no” from the drop
down list on the Apply to Invoices tab to whom you want to charge the
returns.
- The
Item field, Quantity field, Unit Price field and Description field will be
automatically filled with the details of Invoice no. selected.
- Enter
the no. of items you want to return in the “Returned” field.
- Select
the Inventory Account in the “GL
Account” field.
- SThe
“Amount” field will be
calculated by multiplying Returned field with the Unit Price field.
o
Click on “Save” button to save the transaction.
Maintaining Global Options
Go to Options Menu and
click on “Global”, following window
will open
Following Tabs will be
available on the Global Options window:
1.
Accounting
2.
General
3.
Peachtree Partners
4.
Spellings

1. Accounting Tab:
·
Under this tab user can select the
number of decimal places to be used
in entering numbers in the software, if selected manual then user has to give
decimals manually (no interference of software). But if we select automatic
option, then software will automatically place the decimals in the numbers
entered. User can select no. of decimal places from the drop down menu.
·
User can also hide the Account Receivable Field in Sales Orders, Quotes, Invoices, Credit Memo for Internal
Control Purposes. Account Payable Field
can also be hide from Purchase Order, Credit Memo and Payment windows by
clicking on the check box.
·
Other
prompt options can also be customize in this tab.

2. General Tab:
·
General tab is used to set the software
interface options; different Color
Schemes are available for the software.
·
Improve
performance is used to selecting options for
improving the software processing time.
User
can select One Line Item Entry Display
to view only one horizontal line and Two
Line Item Entry Display to view two lines in var